Tutorial For Beginners: How to Use CapCut
CapCut is a free, user-friendly video editing app that empowers users to transform their smartphone footage into professional-quality content. With features like cutting, speed adjustments, music integration, and text overlays, CapCut caters to both beginners and seasoned content creators.
Since its international release in 2020, CapCut has rapidly gained popularity among content creators, especially those on platforms like TikTok, Instagram, and YouTube. Its seamless integration with TikTok and a vast array of templates have made it a go-to tool for producing engaging short-form videos.
In this tutorial, you'll learn how to use CapCut, from basic editing techniques to advanced features like keyframe animation and masking. Whether you're new to video editing or looking to enhance your skills, this guide will help you create captivating videos that resonate with your audience.
Getting Started with CapCut
As a versatile video editing application, Capcut is available across multiple platforms, including iOS, Android, Windows, and macOS. To begin your creative journey with CapCut, follow these steps:
Download and Installation
-
For iOS and Android Devices:
-
Open the App Store (iOS) or Google Play Store (Android) on your device.
-
Search for "CapCut" in the search bar.
-
Locate the official CapCut app in the search results.
-
Tap "Get" (iOS) or "Install" (Android) to download and install the app.
-
-
For Windows and macOS:
-
Navigate to the download section and select the appropriate version for your operating system.
-
Click the "Download" button to obtain the installer file.
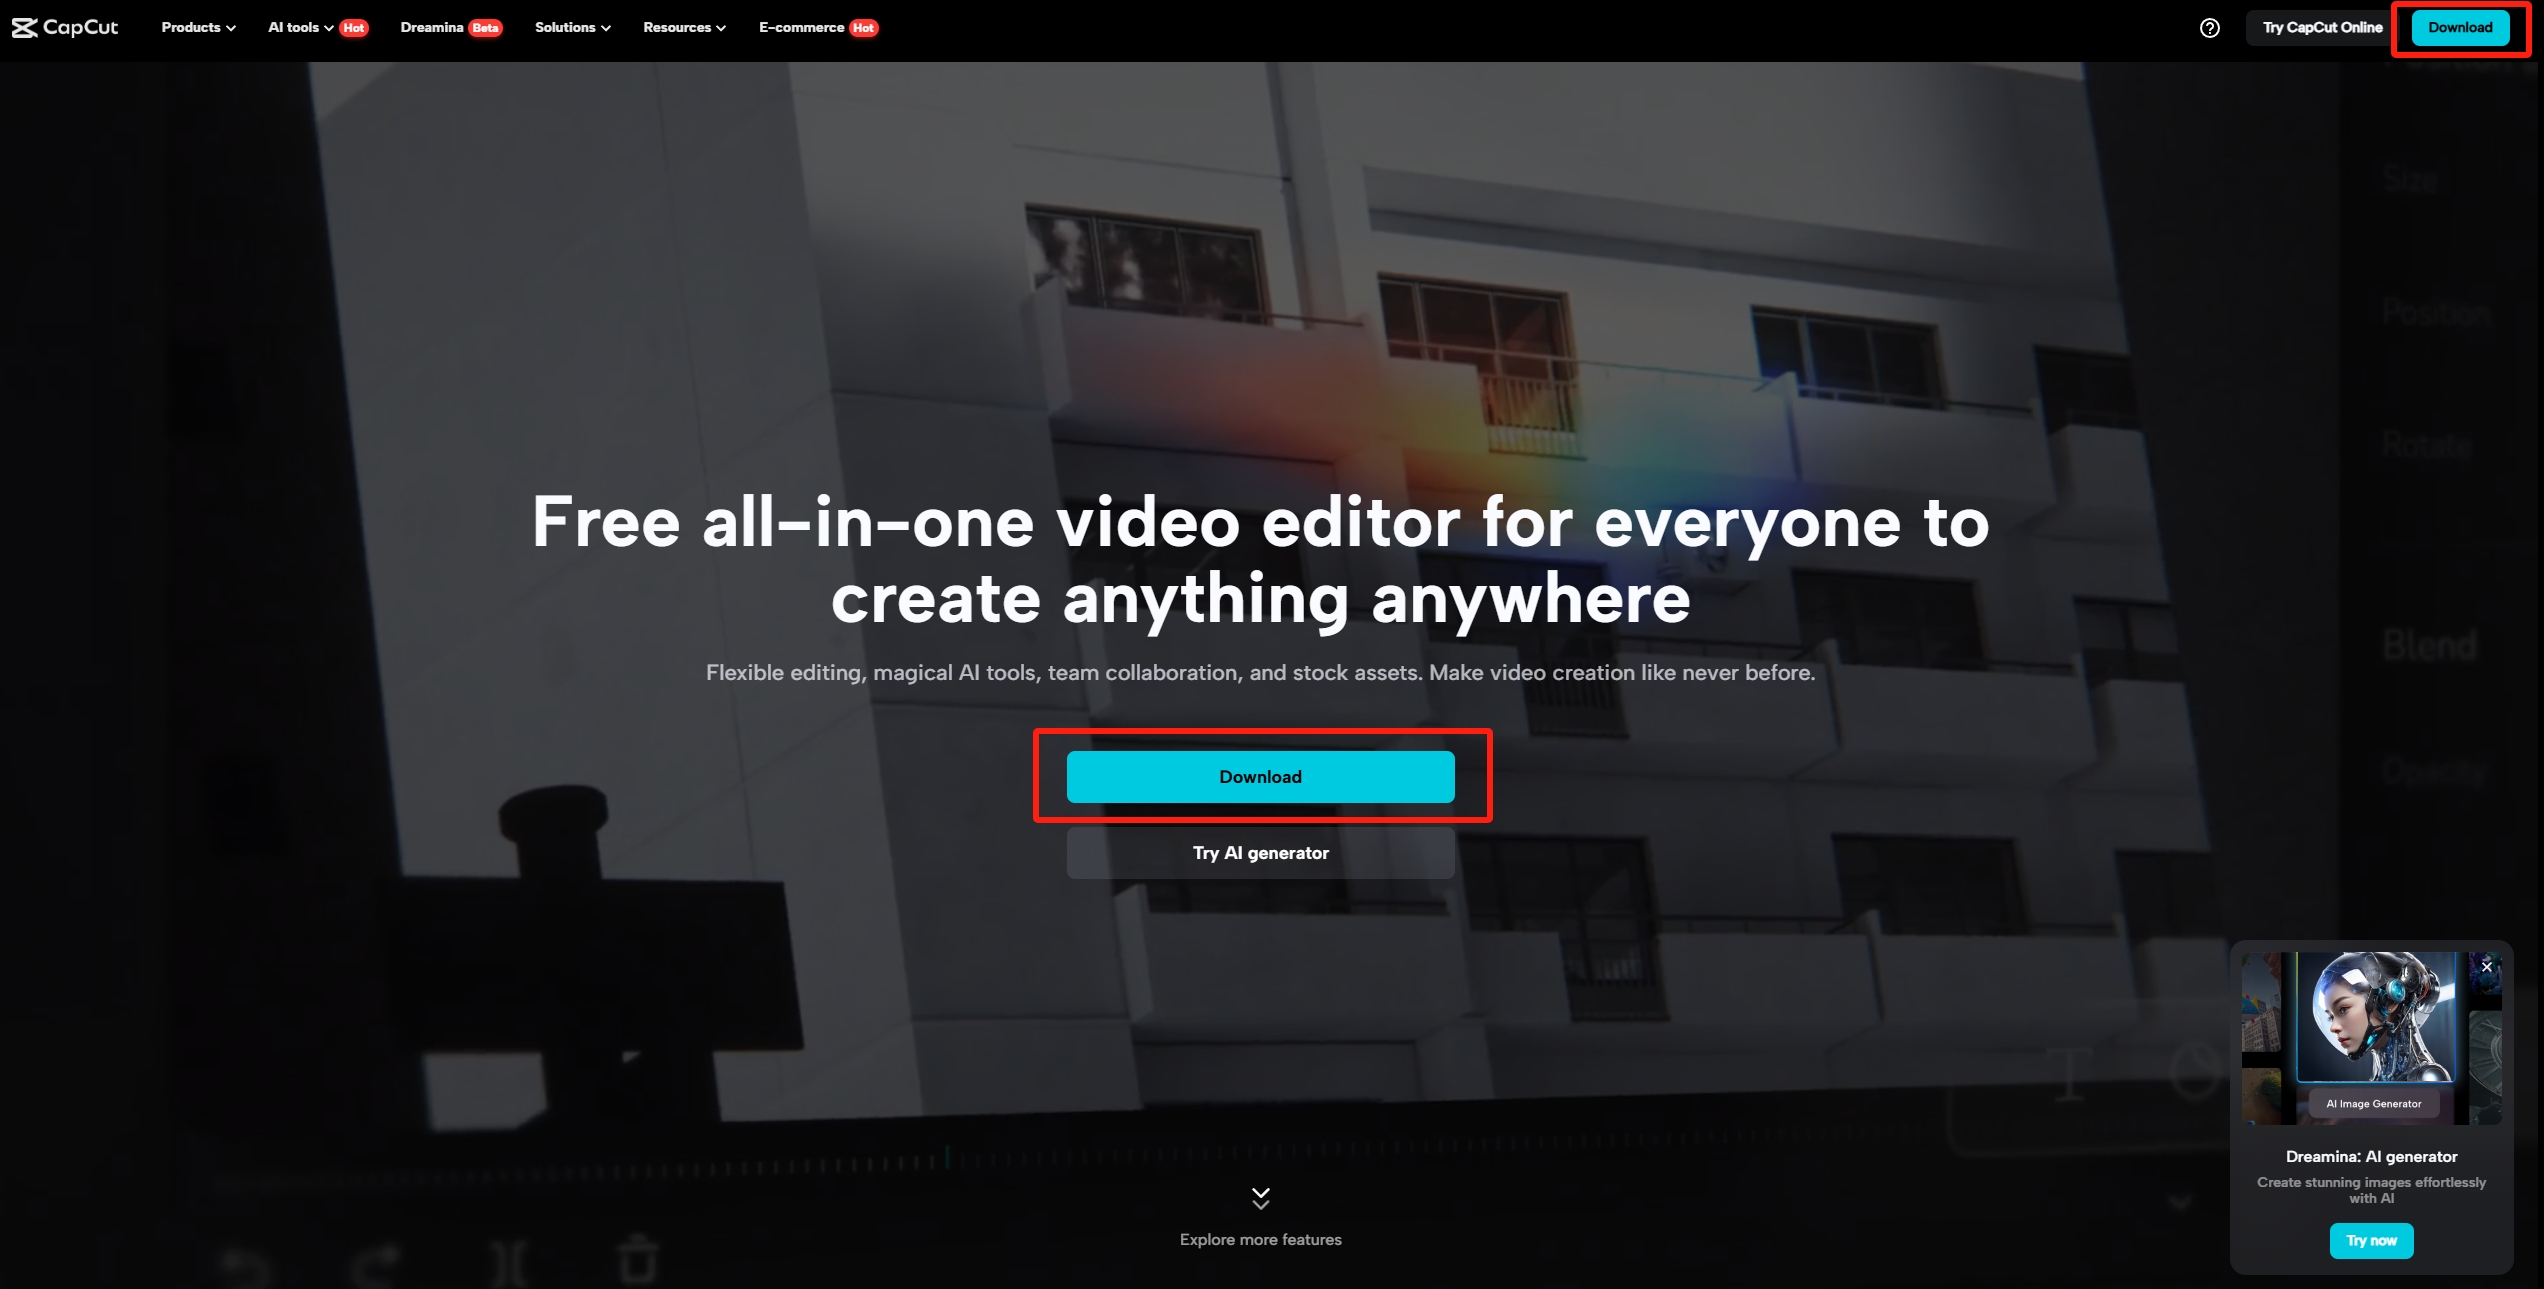
- Once downloaded, open the installer and follow the on-screen instructions to complete the installation process.
System Requirements
To ensure optimal performance, your device should meet the following minimum system requirements:
-
iOS: iOS 12.0 or later.
-
Android: Android 5.0 or higher.
-
Windows: Windows 10 or above, Intel Core i3 processor, 4 GB RAM, and 2 GB of available storage space.
-
macOS: macOS 10.14 or later.
Overview of the Capcut User Interface
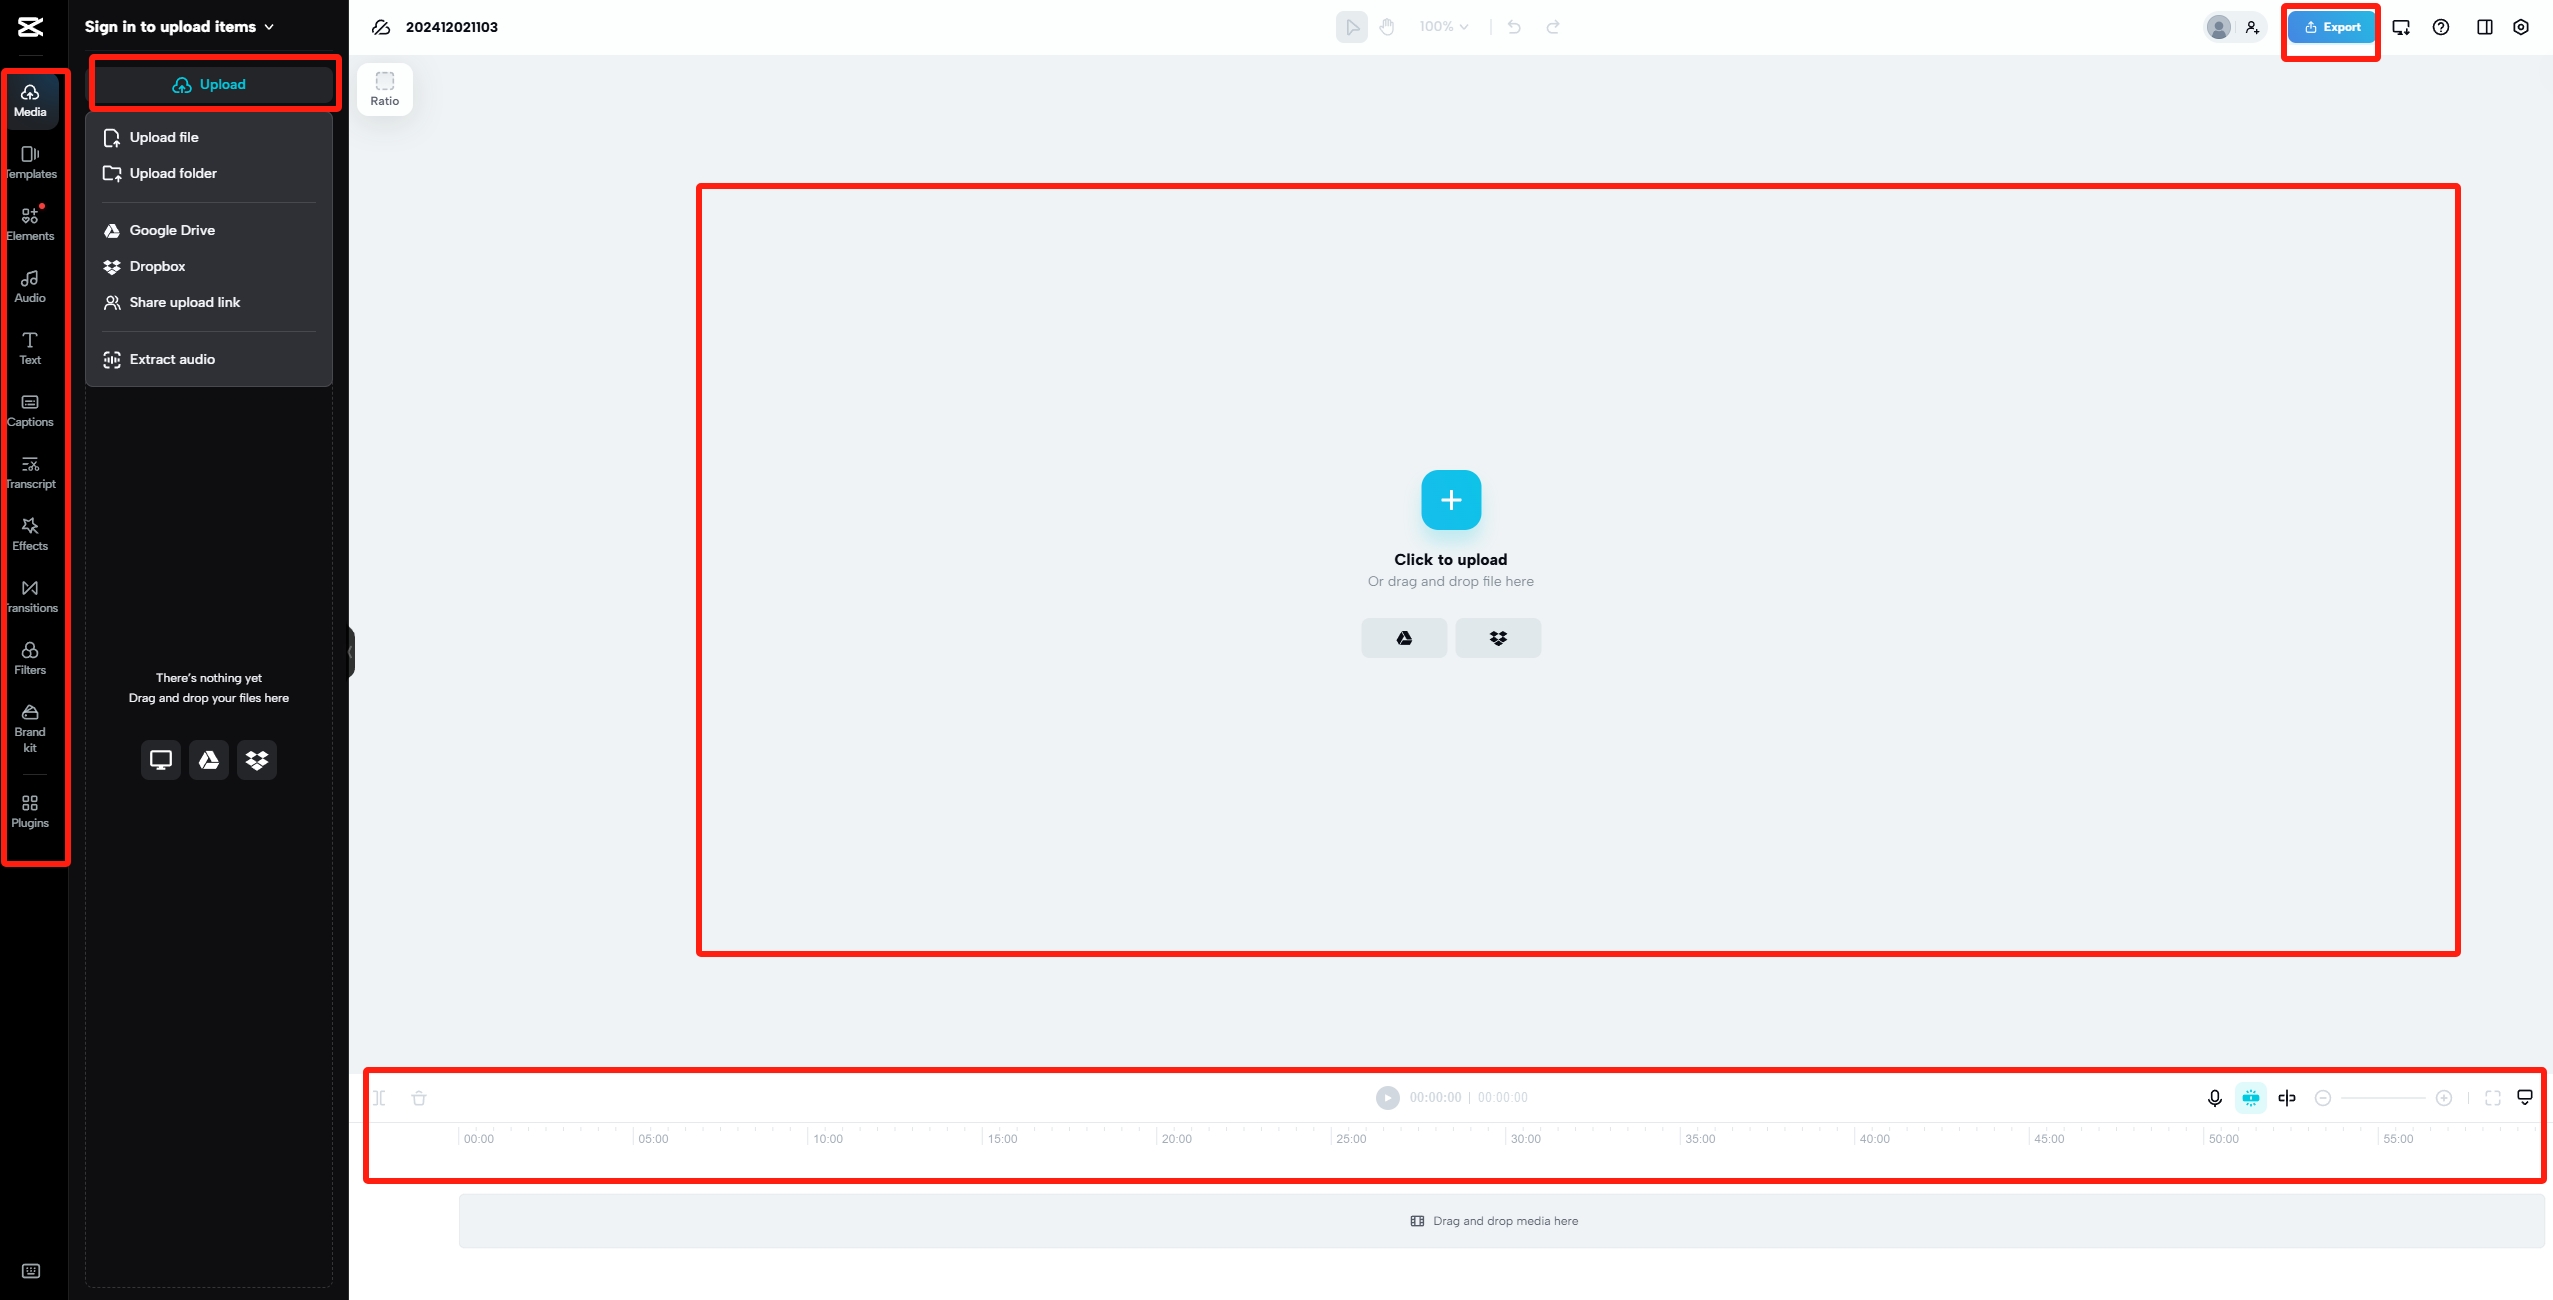
Upon launching CapCut, you'll encounter a user-friendly interface designed to streamline your editing process. The main components include:
-
Timeline: Located at the bottom of the screen, the timeline allows you to arrange and edit your video clips sequentially.
-
Editing Tools: Situated above the timeline, these tools enable you to perform functions such as splitting, trimming, and adjusting the speed of your clips.
-
Preview Window: Positioned at the top center, this window provides a real-time display of your video as you make edits.
-
Media Library: Found on the left side, the media library houses all your imported videos, photos, and audio files for easy access.
-
Effects Panel: Located on the right, this panel offers a variety of filters, transitions, and special effects to enhance your video.
Basic Video Editing in CapCut
Mastering basic video editing in CapCut is essential for creating engaging content. Here's a step-by-step guide to help you get started:
Importing Media
-
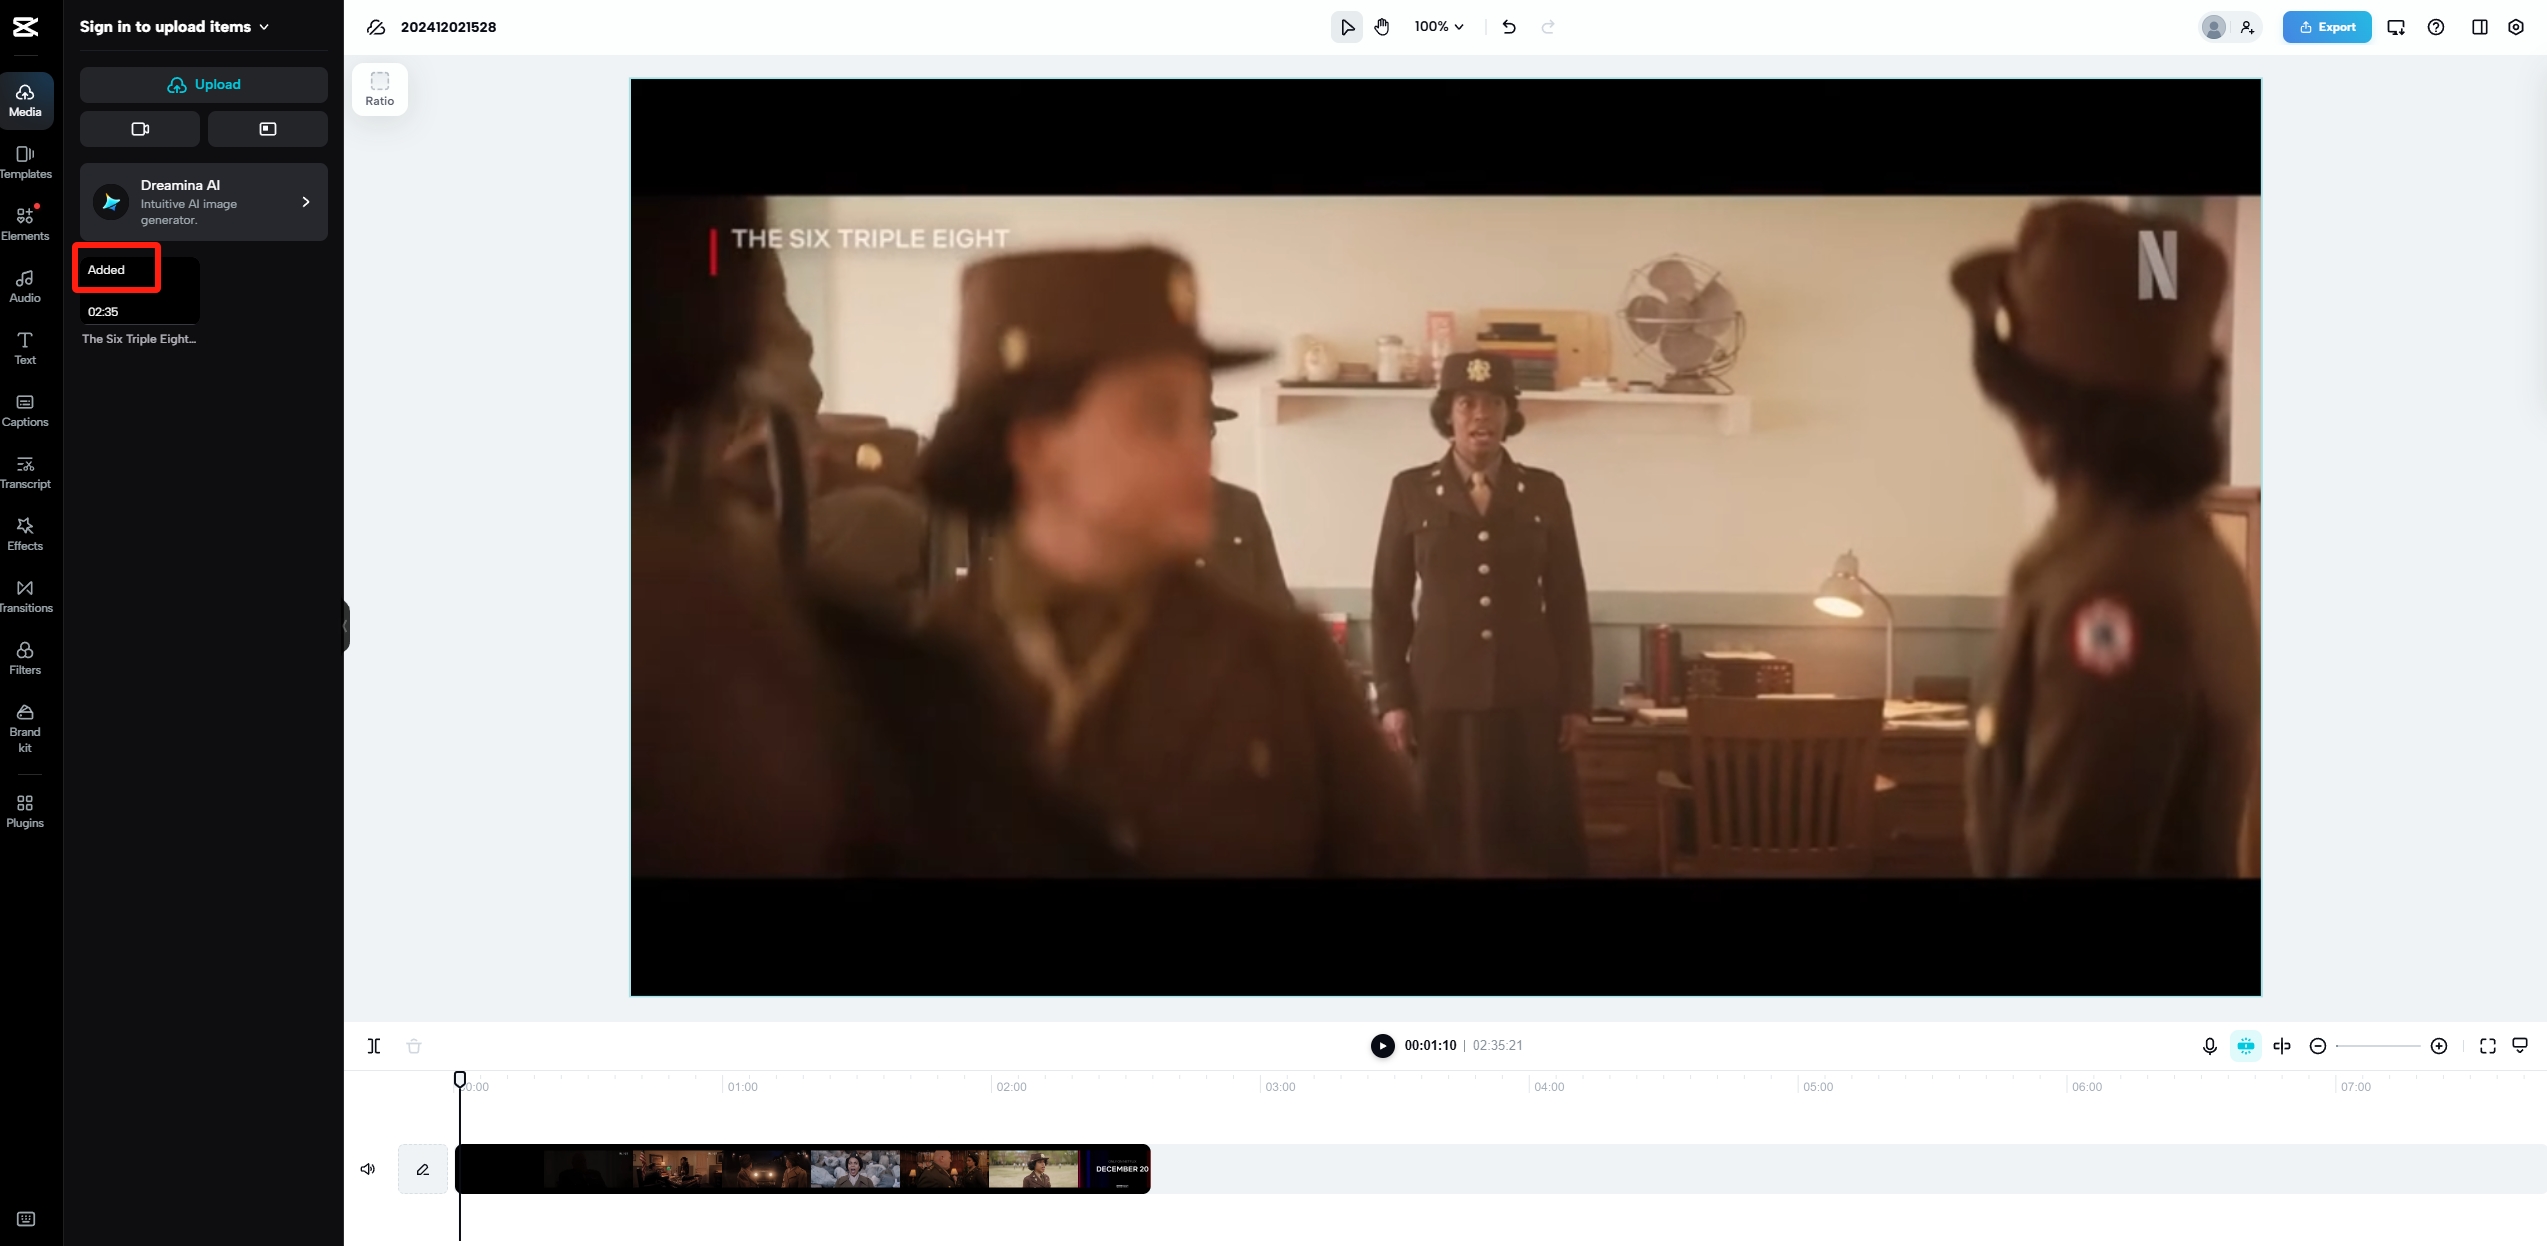
Launch CapCut and tap on "Click to upload".
-
Select Media: Choose the videos and photos you want to include from your device's gallery. Tap on each desired item; a checkmark will indicate selection.

- Add to Timeline: After selecting, tap "Open" to import the media into your project's timeline.
Trimming and Splitting Clips
-
Trimming Clips:
-
Tap on the clip in the timeline to activate editing.
-
Drag the white handles at the beginning or end of the clip to adjust its length, effectively removing unwanted sections.

-
- Splitting Clips:
-
Position the playhead (the vertical white line) at the point where you want to split the clip.
-
Tap the "Split" button to divide the clip into two separate segments.

-
Adding Text and Stickers
-
Adding Text:
-
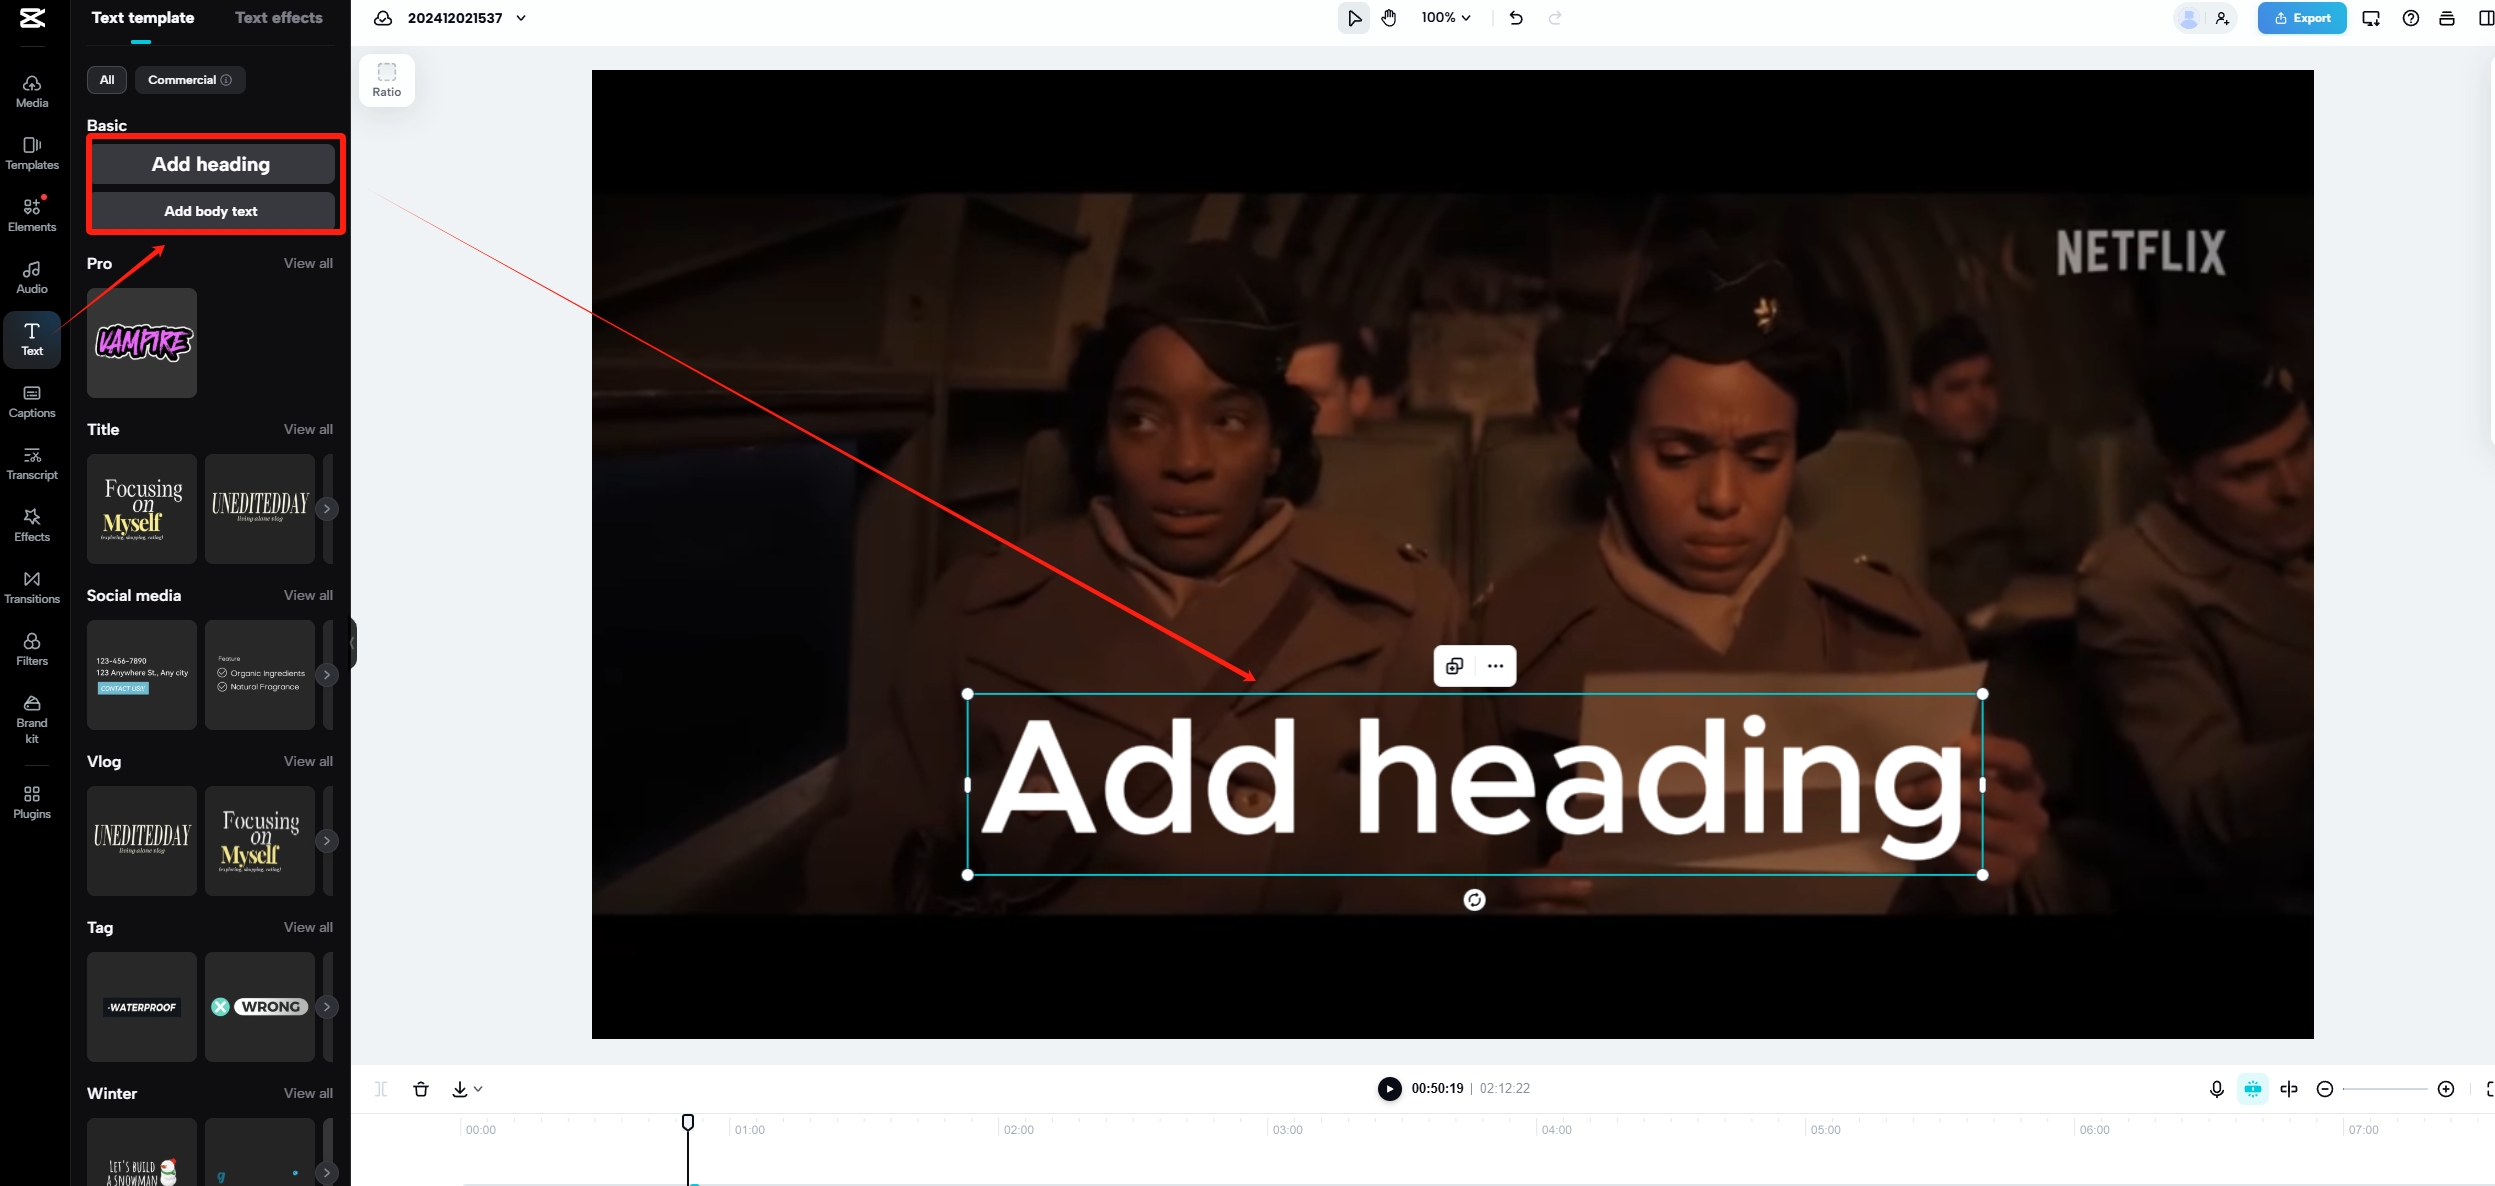
Tap on the "Text" option at the bottom menu.
-
Select "Add heading" or "Add body text" and type your desired message.
-
Customize the text by choosing fonts, colors, and animations.
-
Position the text on the video by dragging it to your preferred location.
-
- Adding Stickers:
-
Tap on the "Elements" option in the bottom menu.
-
Browse through the available categories to find a sticker that suits your video.
-
Tap on the sticker to add it to the timeline.
-
Adjust the size and position of the sticker by pinching and dragging on the preview screen.

-
By following these steps, you can effectively import media, trim and split clips, and enhance your videos with text and stickers, making your content more engaging and visually appealing.
Exploring Advanced Features in CapCut
Elevate your video editing skills in CapCut by exploring its advanced features, which can transform your projects into professional-quality productions. Here's how to utilize transitions, keyframe animations, and the Chroma Key feature:
Transitions and Effects
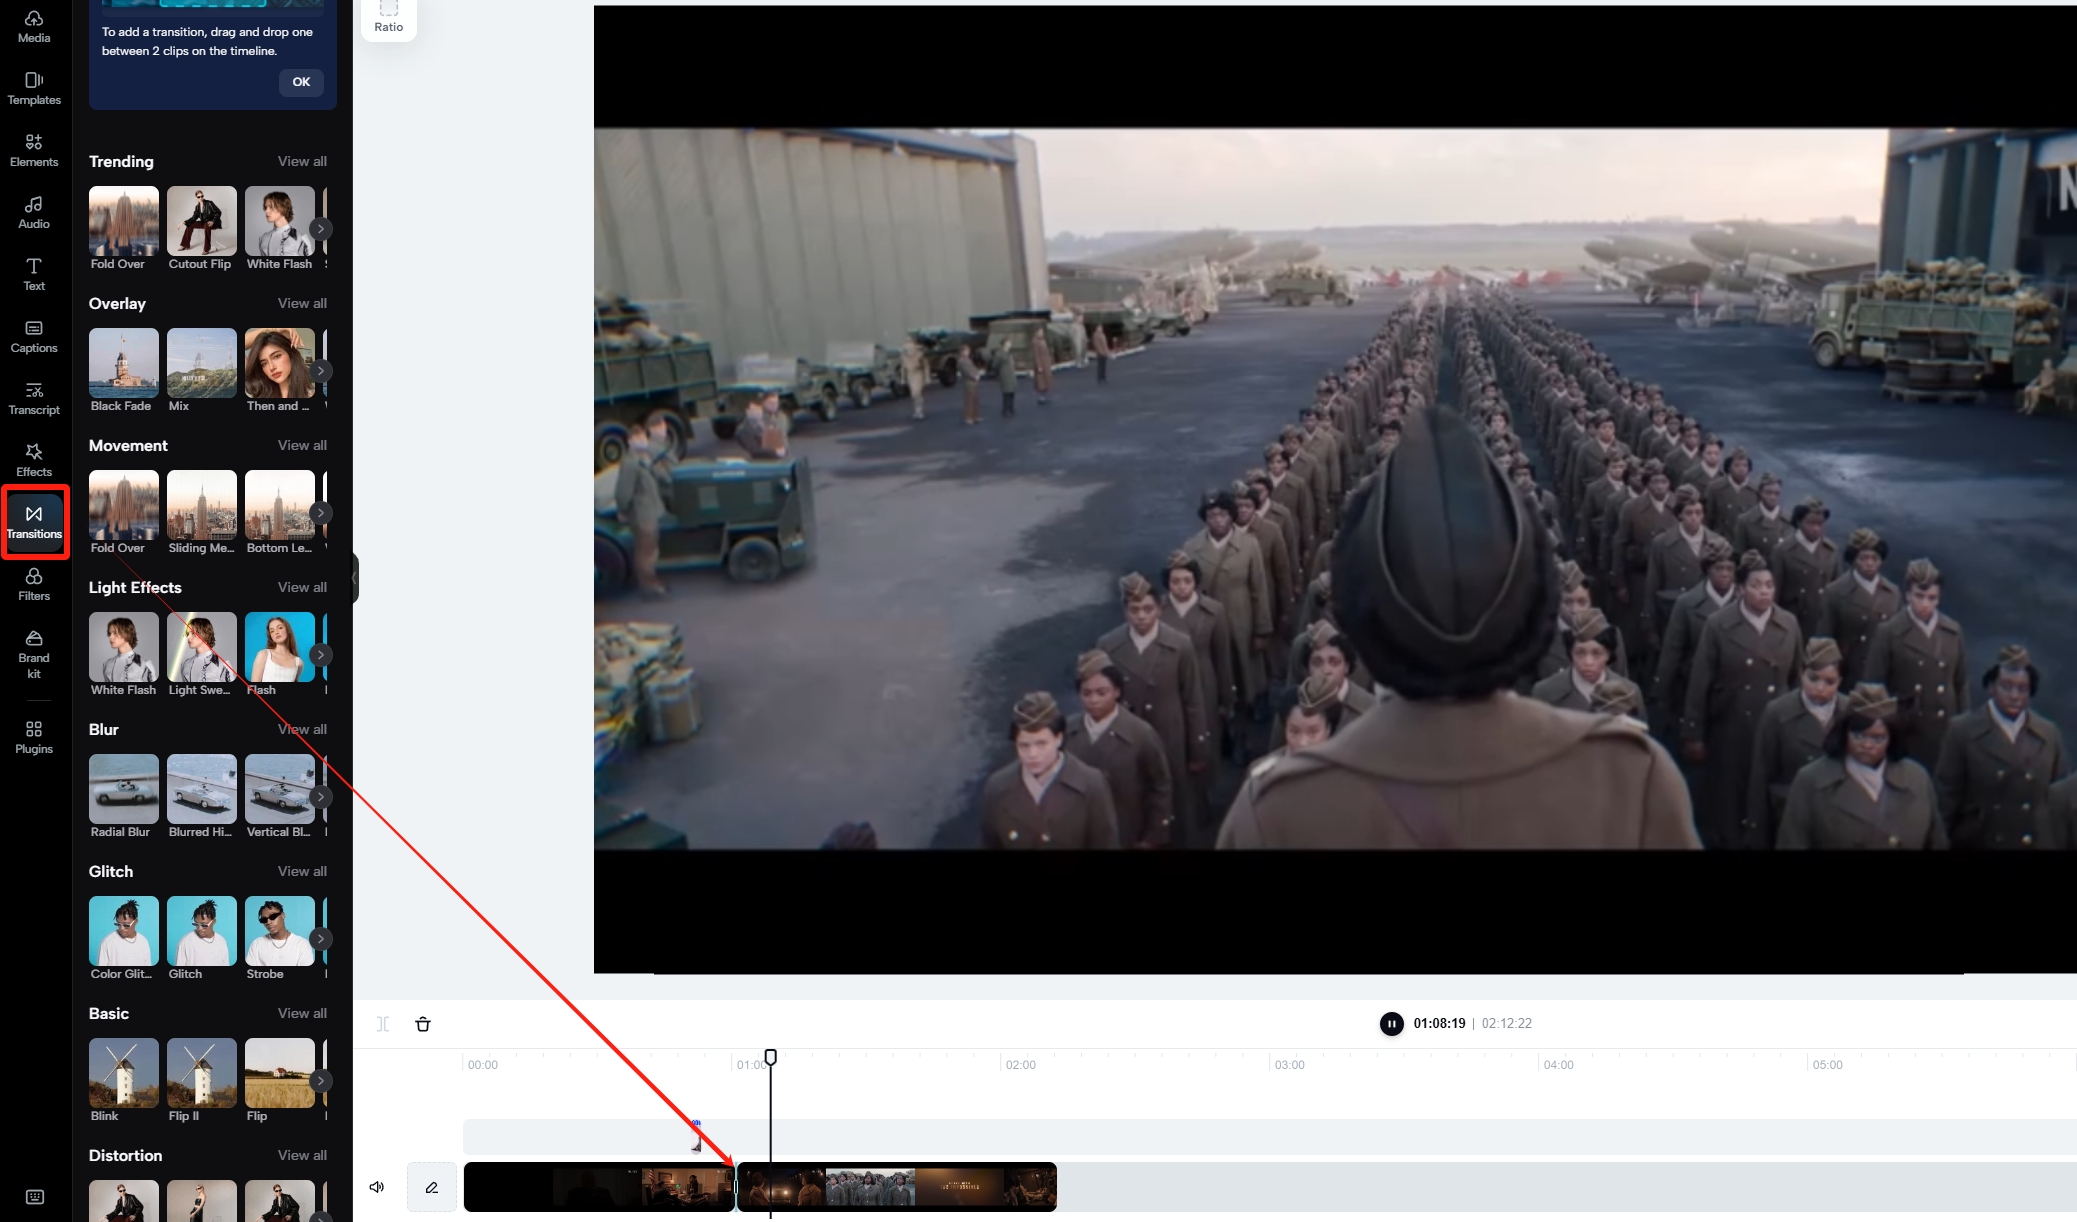
Smooth transitions and cinematic effects enhance the flow and visual appeal of your videos. To apply them:
-
Adding Transitions:
-
In the timeline, tap the white square between two clips.
-
Select "Transition" to access various transition effects.
-
Choose a transition that complements your video's style.
-
Adjust the duration to control the transition's speed.
-
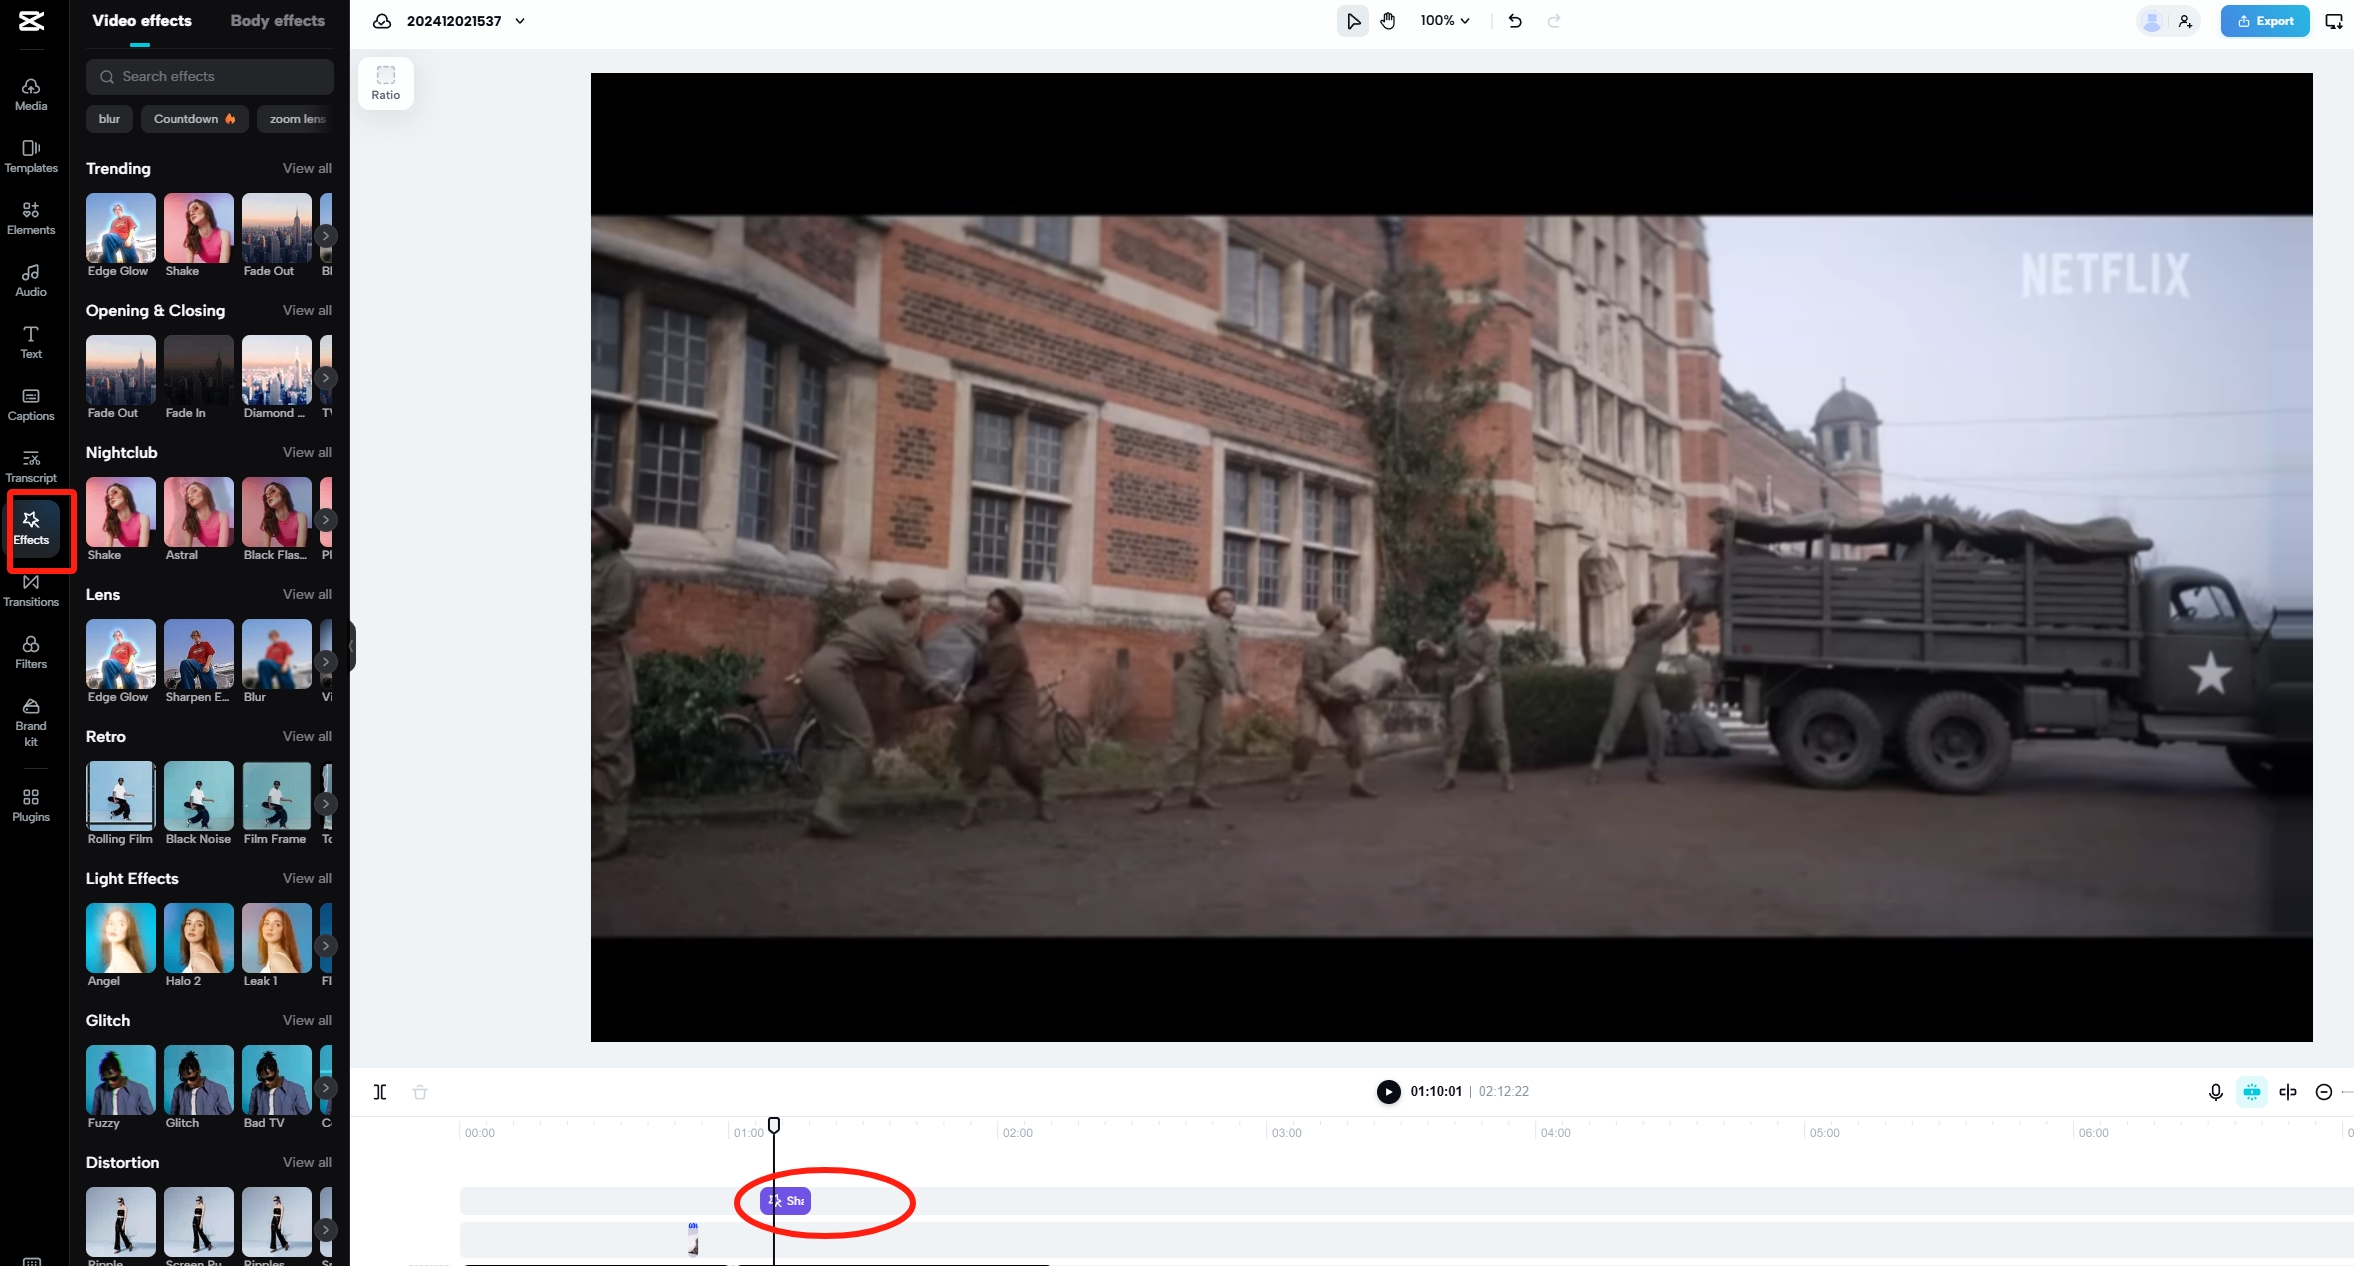
- Applying Effects:
-
Tap on the clip you want to enhance.
-
Select "Effects" from the bottom menu.
-
Browse through categories like "Trending", "Retro", or "Party" to find suitable effects.
-
Tap on an effect to preview and apply it.
-
Keyframe Animation
For intermediate users aiming to create dynamic animations:
-
Understanding Keyframes:
-
Keyframes allow you to set specific points where certain properties (e.g., position, scale, opacity) change over time, enabling smooth animations.
-
- Implementing Keyframes:
-
Select the clip you want to animate.
-
Tap the "Keyframe" icon (a diamond shape) at the point where you want the animation to start.
-
Move the playhead to a different time position and adjust the clip's properties (e.g., move its position or change its size).
-
CapCut will automatically animate the changes between keyframes, creating smooth transitions.
-
Using Chroma Key
To replace backgrounds using the Chroma Key (green screen) feature:
-
Preparing Your Footage:
-
Ensure your subject is filmed against a solid-colored background, preferably green or blue.
-
- Applying Chroma Key:
-
Import both your background and foreground clips into CapCut.
-
Place the background clip on the main track and the foreground (green screen) clip on the overlay track.
-
Select the overlay clip and tap "Chroma Key" from the bottom menu.
-
Use the color picker to select the background color you want to remove.
-
Adjust the "Intensity" and "Shadow" sliders to fine-tune the effect, ensuring the background is fully removed and the subject blends seamlessly with the new background.
-
By mastering these advanced features, you can significantly enhance the quality and professionalism of your videos, making them more engaging and visually captivating.
How to Export and Share Capcut Video
Resolution and Aspect Ratio Settings
Resolution determines the clarity of your video, while the aspect ratio defines its width-to-height proportion. Aligning these settings with platform specifications ensures your content displays correctly:
-
Resolution: For most social platforms, a resolution of 1080p (1920x1080 pixels) is standard, offering clear and crisp visuals.
-
Aspect Ratio:
-
TikTok and Instagram Reels: Use a 9:16 aspect ratio for vertical videos.
-
YouTube: A 16:9 aspect ratio suits horizontal videos.
-
Exporting in HD for Social Platforms
To maintain high-definition quality on platforms like TikTok, Instagram, and YouTube:
-
Set the Frame Rate: Choose 30 frames per second (fps) for smooth motion.
-
Adjust Bitrate: A higher bitrate enhances video quality. For 1080p videos, a bitrate between 8-12 Mbps is recommended.
-
Enable High-Quality Uploads:
-
Instagram: In the app settings, navigate to **Account > Data Usage**, then enable "High-Quality Uploads" to prevent compression.
-
TikTok: Before posting, toggle on "Upload HD" to ensure your video retains its quality.
-
By meticulously configuring these settings, your videos will appear sharp and professional across all platforms, enhancing viewer engagement and satisfaction.
Enhance your CapCut editing efficiency with these pro tips, focusing on utilizing templates, presets, and time-saving techniques:
1. Leverage Templates and Presets
CapCut offers a diverse array of templates and presets to streamline your editing process:
-
Accessing Templates: Navigate to CapCut's Template Library to explore trending and professionally designed templates suitable for various content styles.
-
Applying Presets: Utilize built-in presets for filters, transitions, and effects to maintain consistency across your videos, enhancing their visual appeal.
2. Implement Time-Saving Techniques
Optimize your workflow with these strategies:
-
Batch Editing: CapCut's batch editing feature allows you to apply changes to multiple clips simultaneously, such as adjusting brightness or adding filters, thereby reducing repetitive tasks.
-
Keyboard Shortcuts: Familiarize yourself with essential keyboard shortcuts to expedite your editing process. For instance, pressing 'K' splits a clip at the playhead position, 'C' copies a selected clip, and 'V' pastes it onto the timeline.
By integrating these templates, presets, and time-saving methods into your editing routine, you can produce high-quality videos more efficiently, allowing for greater creative expression.
Conclusion: Wrapping Up Your CapCut Journey
Congratulations! You’ve just taken your first steps into the world of video editing with CapCut. In this tutorial, you’ve learned how to import media, trim and split clips, enhance videos with text and stickers, and even apply advanced features like transitions, keyframe animation, and Chroma Key. Additionally, you now know how to fine-tune export settings to ensure your videos look stunning on platforms like TikTok, Instagram, and YouTube.
Remember, mastering CapCut is all about practice. Don’t be afraid to experiment with the app’s features—try out different templates, tweak effects, or explore advanced settings. The more you practice, the more confident you’ll become in creating content that captivates your audience.
Now it’s your turn! Download CapCut, follow the steps outlined in this guide, and unleash your creativity.